 A distribution list, or contact group, is a feature found in most email clients and providers that allows us as users to:
a) store and maintain a list of multiple email addresses and
b) easily send mails to multiple people at once.
Distribution lists and contact groups have a variety of practical applications.
Need to send an email that all members of the Human Resources team must see? Instead of adding each individual employee’s email in the “To” field (and risk forgetting someone) why not set up our email to simply send/deliver to HR@company.com and have it sent to all the needed individuals?
Or, if we have a ‘request more information’ link (or something similar) on our web page and/or company literature, wouldn’t it be better to just publish info@company.com as the needed email address rather than a specific individual’s email (forcing us to update each time responsibilities change)?
 Finally, distribution lists make the administrative management of email and delivery much easier as well because we are able to “nest” lists inside one another. This means, for example, we can set up lists for each of our departments (HR, Marketing, IT, etc) and then include those smaller lists as members of our allstaff@company.com email list, meaning our company-wide communication will always be accurate as long as the smaller, more focused lists are maintained.
Now that we have reviewed the basics of distribution lists and the benefits they provide, let’s take a look at how to set one up for use! Please note: though they serve a similar function, contact groups are local (on a per user basis) and distribution lists are global (on an all user basis). If we are interested in implementing global, company-wide lists of this sort, it is best to contact your IT administrators for assistance with modifying the needed settings and configurations within the Office 365 email administration portal.
If we are just looking to simplify our own personal email use though, we can follow these steps to set up our own contact lists/groups:
Create a Contact Group in Office 365
- Log into our O365 web portal and access the Outlook web application.
- On the navigation bar (bottom left), locate and click the ‘People’ icon.

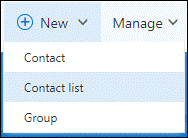
- Once on the main ‘People’ home screen, look towards the top left for +New and click the down arrow indicator to open a selection menu.
- Select ‘Contact List’

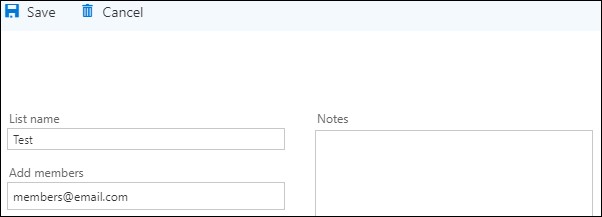
This will take us to the list creation screen.
- Enter the desired name for our contact list.
- Add any member we wish to the list. When adding members, we can search our company directory, add members from our contacts, or add any external mail address we wish by manually entering the needed email address.
(optional step) Add any notes concerning the identification/purpose of the list in the appropriate field.
- Save the list once complete.

Now that our new list is created, we can use it to send emails to the identified members by adding the list into the “To” field of any new message.
Again, please note that the steps outlined above are for local, per user contact lists only – meaning any lists I make for myself will not be readily available for my co-workers to use (unless they create their own copy). If you wish to set up and utilize global distribution lists, contact your IT/email administrators!
Don't have an IT/ Email Admin?
For many, email management devolves into simply removing emails from a server and saving them to a repository. In most cases, this is not enough because, to do it right, each one must be classified, stored, and perhaps destroyed in a manner consistent with established business policies and standards – just as should be done for all other kinds of documents and records. This is where CTTS comes in, our expertise in email management can help you find the right tool specifically for your businesses needs. We'll implement systematic control of the quality and quantity of specified electronic messages that are sent from within, and received by your organization. You'll feel more relaxed when your email is effectively managed and monitored. Give us a call today for a free assessment: (512) 388-5559.

By Brandon Kaylor
Desktop Support Technician
Central Texas Technology Solutions
